Official Manual / First Use
Shadowrocket Setup Guide
Set up for the first time in five steps, from an existing subscription to connection verification. First connect one server successfully, then adjust rules and automatic connection settings.
Follow the steps in order. If you have already imported your details, start with Global Routing. To organize multiple subscriptions, back up, or update them in bulk, see the server management manual.
Step 01 / Add a server to the list
Add Server / Subscribe: Add and import
First identify the information you have. An address used to update a server list is a subscription link; a set of details containing Type, Host, Port, and authentication fields is generally used to add a server manually. These use different entry points. Do not paste a subscription link into Host or guess the protocol from the beginning of a link. Follow your service provider’s instructions, and keep the original information for checking each field later.
Import an existing subscription with Subscribe
Open Config, find Subscribe, and add your existing subscription. Enter a recognizable name, paste the complete link into the corresponding address field, and save. Check for spaces, line breaks, or non-English punctuation at either end of the pasted link, and make sure you have not omitted parameters after the question mark. Then update and wait for the result. Return to Home and check whether server entries appear in the SERVER group. Saving an address does not mean the server list has been retrieved successfully.
If the list is still empty after updating, check the update feedback first; do not repeatedly create the same subscription. An expired link, missing authentication parameters, or a network that cannot reach the subscription address can all cause an update to fail. Ask your service provider to confirm the link status if needed, but do not post the complete link in public screenshots or forums; its parameters may grant personal access.
Enter details manually with Add Server
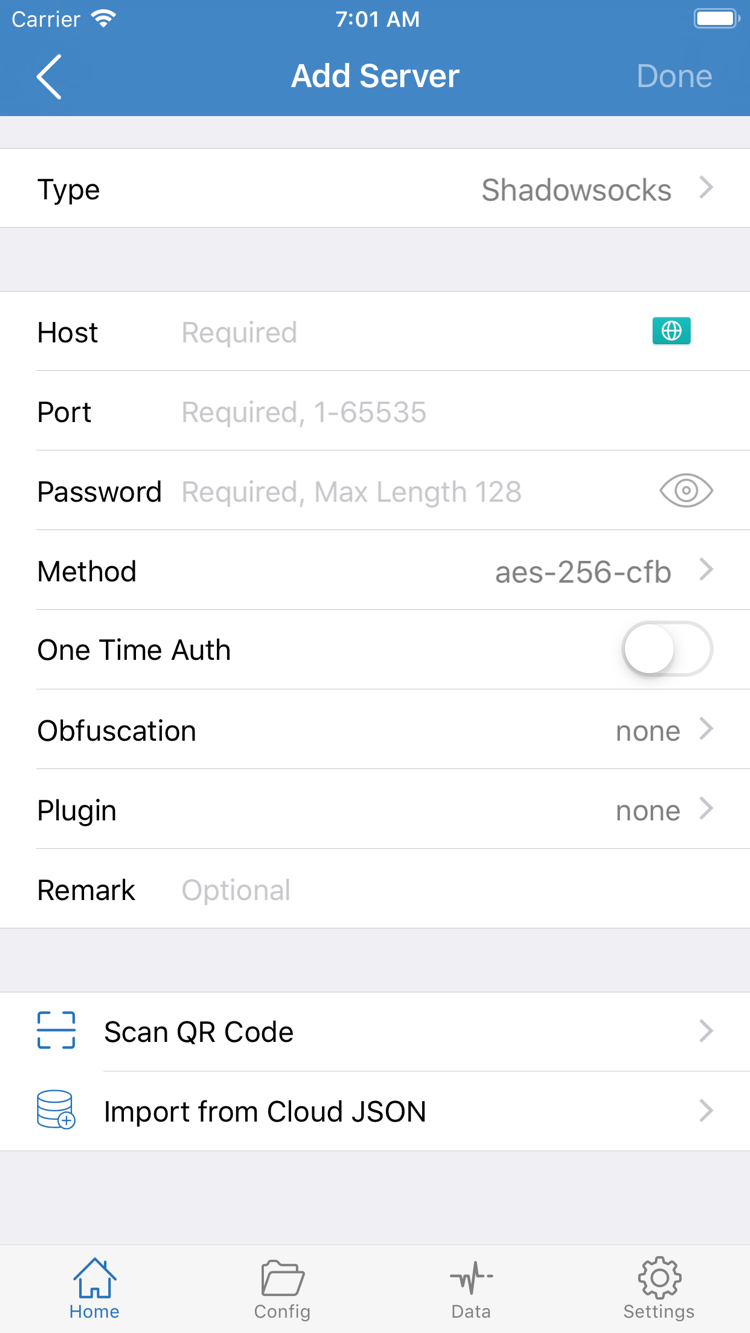
If you only have details for an individual server, open Add Server from the SERVER group on Home. Select Type first, then fill in the corresponding fields, since Type affects the authentication method required. For the fields shown in the screenshot, enter the server domain or address in Host, the port in Port, and the original Password and Method values. Host is generally not a web address and should not include a page path. Port must match the server; do not substitute a test port for the connection port.
Fields vary by protocol. After selecting VMess, VLESS, Trojan, or Hysteria2, fill in any additional authentication or transport options according to the protocol details. Do not treat every authentication value as Password. Server addresses and TLS-related names may also differ. If a field is missing, check the original configuration instead of trying to disable the related checks.
If you have a QR code, use Scan QR Code at the bottom of Add Server. Allow camera access, scan the code, and check the imported result. Import from Cloud JSON is for the corresponding JSON configuration, not a replacement for the regular subscription entry point. If the system prompts you to import from the clipboard, confirm that it contains your own share link before continuing. After import, check that Type and the address are as expected.
After saving, return to Home and confirm that the new entry appears in the SERVER list. Give it a recognizable name. This completes the addition, but does not confirm that the connection works. Next, choose Global Routing, select the server, and connect so that rule issues are not mistaken for an import failure.
Step 02 / Choose how requests are handled
Global Routing: Choose a mode
Return to Home, tap Global Routing, and choose Config / Proxy / Direct for your current purpose. These options determine how traffic is handled; they do not replace server details or fix an expired subscription. Before your first connection, understand which mode is selected so you can tell whether a page should use the proxy.
Config: Route traffic using the current rules
If you have a configuration file, select Config and confirm in Config that the intended file is enabled. The Rule entries in the configuration determine which policy handles a matching request: DIRECT means a direct connection, REJECT means the request is rejected, and PROXY sends it to the corresponding proxy policy. Rules are usually matched in order, so an earlier match can affect later handling. The presence of a particular rule alone is not enough to determine the outcome.
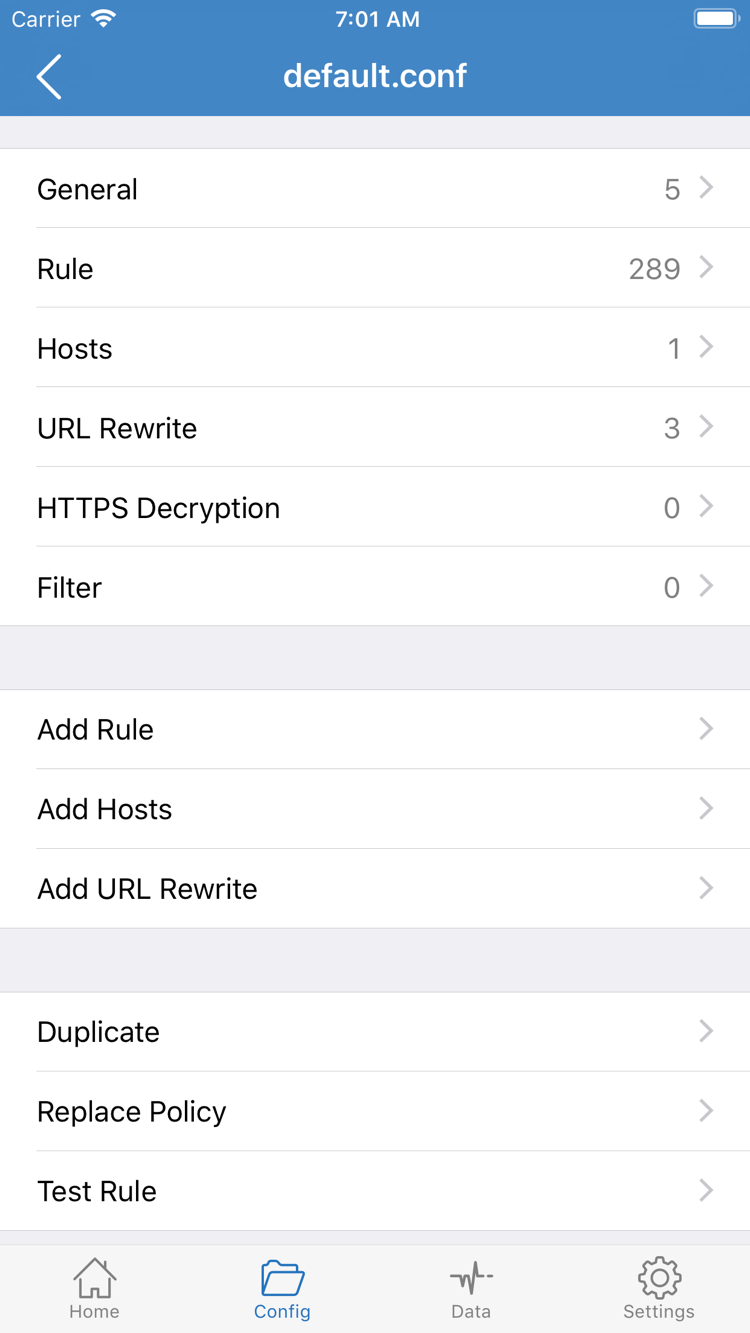
The screenshot shows a configuration editing page in Config, with sections for General, Rule, Hosts, URL Rewrite, and HTTPS Decryption. It is not the Subscribe address entry page. You do not need to edit every section to connect for the first time, and you do not need to enable HTTPS Decryption. Start with a configuration whose purpose you have confirmed, then learn each section as needed. Keep a copy of the original configuration before making changes so you can restore it.
Proxy and Direct: Check a specific route
Proxy can help you check whether the selected server’s proxy route works. Traffic retained by the system or bypass rules in the configuration still need to be considered separately, so do not assume that all data necessarily follows the same route. Direct accesses destinations without using a proxy and can also be used to compare basic network performance. Opening a regular page with Direct selected does not mean the server has connected successfully.
If you are unsure whether existing rules are affecting the result, temporarily use Proxy for a comparison test, note the result, and then restore your original Config. Do not replace the configuration, switch servers, and change DNS at the same time while troubleshooting, or you will not know which change affected the result. Choose a mode, then continue to the connection step.
Step 03 / Select a server, then connect
Home: Connect
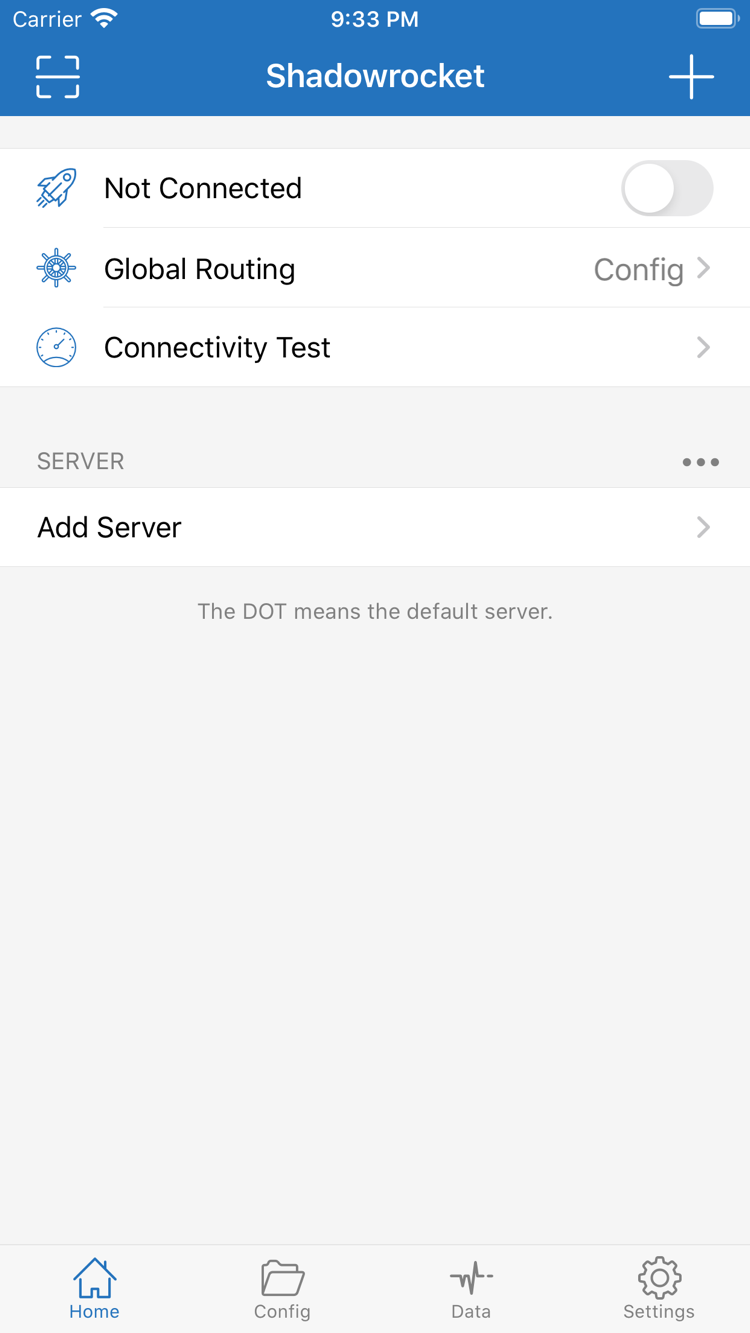
Return to Home and select the server you want to use in the SERVER group. Confirm that the selected marker corresponds to the entry you just checked. If your subscription includes several servers, choose one for verification and avoid switching frequently during the first test. Then check that Global Routing is still set to the intended mode and turn on the connection switch at the top of the page.
The first time you connect, the system may ask you to allow a VPN configuration. Confirm that the request was initiated by Shadowrocket, which you just opened, then follow the system prompt and complete verification with your device passcode or another method provided by the system. If you cancel this step, the client cannot establish the required system connection. Return to Home and turn on the switch again instead of importing the server a second time.
After authorization, return to Home and check whether the status at the top changes from Not Connected and whether the switch stays on. If it turns off immediately, note the prompt and check system authorization and server fields first. A switch that stays on only indicates that the system connection process has started. It does not confirm that every destination is accessible; continue with Connectivity Test and actual request checks.
Keep the network environment stable during testing—for example, complete verification on the same Wi-Fi network. If you switch from Wi-Fi to cellular, wait for the connection to stabilize before trying again so a momentary interruption is not mistaken for a configuration error. Other VPN connections on the device may also affect the current status. When troubleshooting, first confirm which system connection is active.
Keep the existing On Demand settings unchanged until the first manual connection succeeds. On Demand triggers automatic connections; it does not fill in missing authentication fields and should not be used to mask a failed manual connection. To stop the connection, return to Home, turn off the switch at the top, and confirm that the status returns to Not Connected.
Step 04 / Assess status and results separately
Connectivity Test: Verify the connection
Keep the connection on, tap Connectivity Test on Home, and wait for it to finish. The result indicates reachability for that test target and method; it is not a universal conclusion for every website and protocol. If a test fails, do not immediately delete the imported subscription. Cross-check with actual requests.
- Check basic access first. Use a browser to open a regular page that is normally accessible, then reload it to avoid relying on cached content. If even basic pages fail, turn off the connection for comparison and check whether Wi-Fi or cellular service itself is working.
- Check the expected route. Open a page that should use the proxy under the current configuration. If you are using Config, confirm that the rule routes the request through the proxy rather than DIRECT; otherwise, the page loading does not show whether the proxy route works.
- Compare modes last. If the same server works with Proxy but not Config, check whether the configuration is enabled, the rule order, and the policy target. If both modes fail, check the server details and service status.
When recording results, include at least the current network, the selected server’s recognizable name, the Global Routing mode, the test time, and the specific error. “It won’t connect” is not enough: an inaccessible webpage, a failed subscription update, and a timed-out test target are different problems. Change one condition at a time and repeat the same request to get comparable results.
Once manual connection and everyday access are working, consider On Demand, refining rules, or organizing multiple subscriptions. A successful subscription update does not mean the server is available, and an enabled connection switch does not mean every rule behaves as expected.
Step 05 / Check from the outside in, one change at a time
Settings / Diagnostics: Common issues
If the first four steps do not resolve the issue, check in this order: basic network → import result → server fields → mode and rules → test settings. Start with the outermost conditions rather than trying a large number of unrelated switches in Settings. Before making any change, note the original value. Restore it if the change does not help to keep troubleshooting clear.
Subscription update fails or no servers appear
Return to Subscribe in Config and check that the address is complete, the parameters are intact, and no explanatory text was pasted by mistake. Confirm that the basic network is working, update once more, and read the response. If your service provider has changed the subscription address, edit the existing subscription record rather than repeatedly trying the old address. If the update returns no results, check the service status first; do not immediately delete all existing entries, since they may be useful for comparison.
The switch turns on, but access fails
First return to Home and confirm which server is selected in SERVER. Open its editing page and check Type, Host, Port, and authentication values. When entering details manually, watch for full-width characters, spaces at either end, and letter case. If you use additional transport or TLS settings, compare them with the original details one by one. Do not try to fix the issue by arbitrarily lowering security settings.
Once the fields match, make the same request with the same server under Proxy and Config. If only Config fails, check the active file and the Rule policy target in Config. If both fail, compare with another server you already have and ask your service provider to confirm that the service is working. Trying another server is a diagnostic comparison; it does not mean you need to rebuild the original configuration.
Connectivity Test and browser results differ
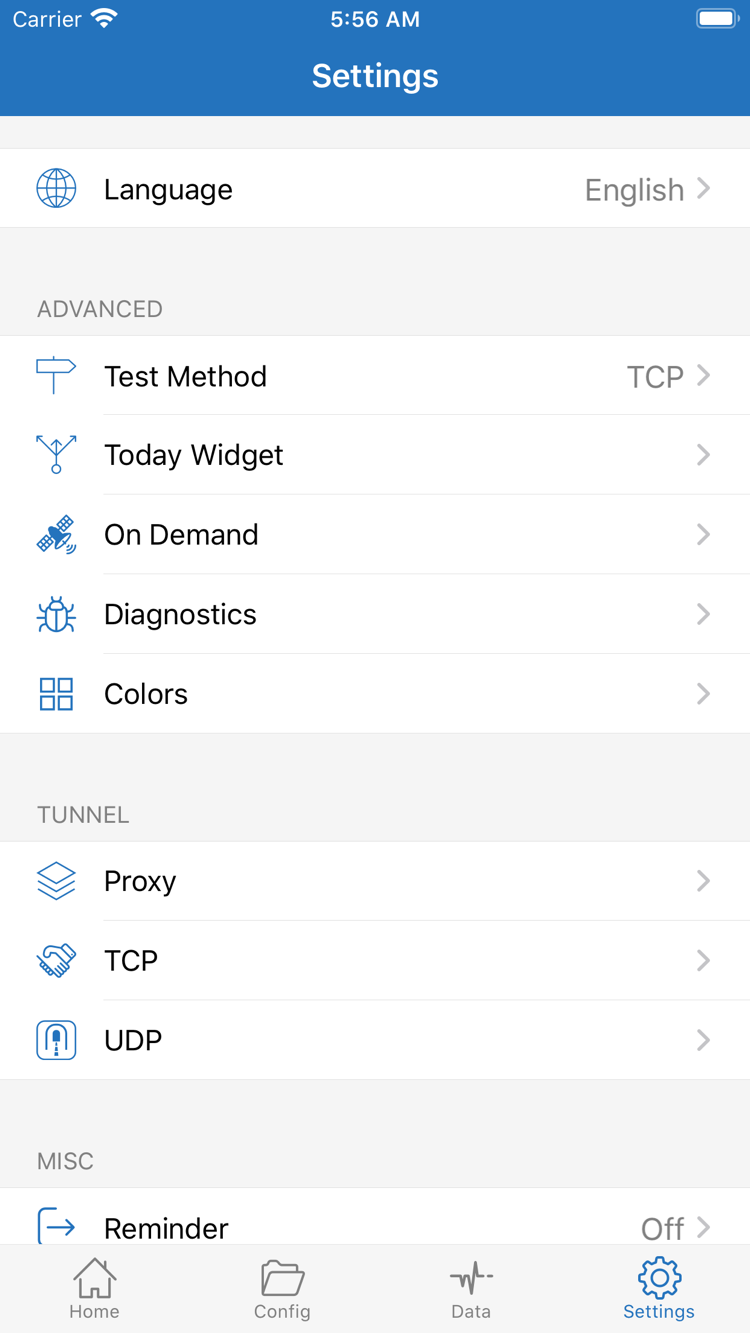
Open Test Method in Settings and confirm that the selected method suits the server environment. Some probes may fail even when actual webpage requests work; conversely, a successful probe does not prove that every resource on a webpage is available. Keep the browser’s actual error and review the related information in Diagnostics rather than changing the entire configuration based on a single test result.
When using Diagnostics to record an issue, keep only the operation needed to reproduce it. Before sharing records, hide subscription addresses, authentication fields, and personal access details. Do not publish a complete configuration file. If you need to compare fields, show only the field names and obscured values.
The connection turns on automatically or behaves unexpectedly after a network switch
Check in Settings whether On Demand is enabled and whether the automatic connection conditions are as expected. For troubleshooting, temporarily disable automatic triggers and test a manual connection from Home. Restore the original settings after confirming that it works. Options such as TCP and UDP are not universal fixes; leave them unchanged without clear evidence. For a systematic guide to update policies, backups, and deletion, continue to the subscription and server management manual. You do not need to complete every advanced setting during your first setup.
Completion checklist: your server is imported, Global Routing is set as expected, the manual connection works, and access has been verified in an actual webpage. If you run into an issue later, revisit the verification steps instead of clearing your configuration first.